RGB Cube
In this activity you will be guided through the construction of the surface development of an rgb cube like the following one.
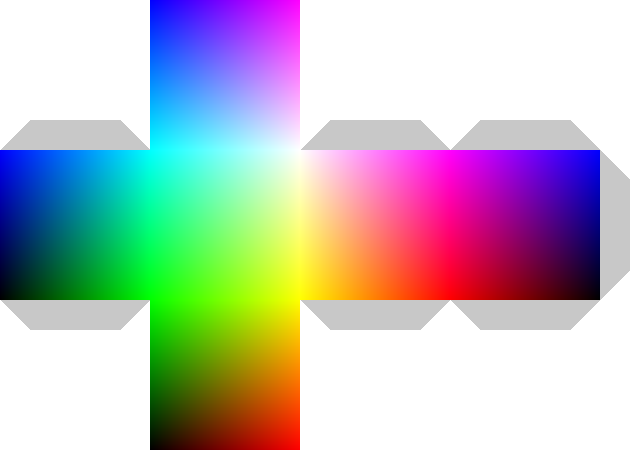
The purpose is to generate a surface development to be printed and folded, and obtain an actual 3D rgb cube.
Surface development of a cube
There are many ways of arranging the squares representing the cube's faces to obtain the surface development of a cube. You can use the combination you prefer.
The RGB cube
An RGB cube is a color model that represents all possible colors by varying the intensity levels of the three primary colors: red, green, and blue. The intensity level of each primary color is represented by a value between 0 and 255, with 0 representing no intensity and 255 representing maximum intensity. By varying the intensity levels of red, green, and blue, any color can be represented as a point within the cube.
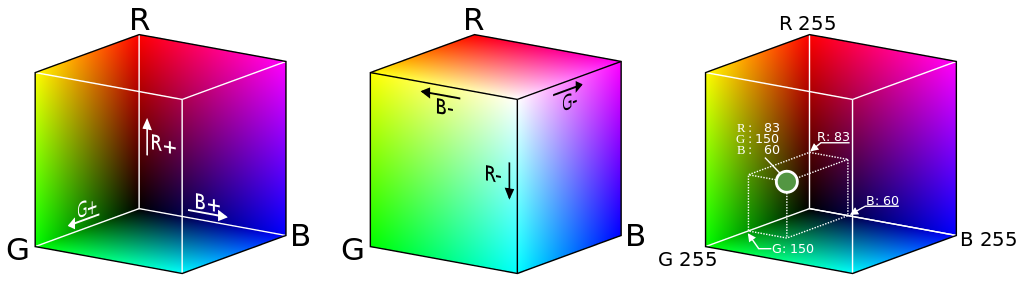
Drawing by User:Maklaan, CC BY-SA 3.0, via Wikimedia Commons
The flaps
Let's start by implementing the flap function that should return a grey trapezoid like the following one:

You can pick the color you prefer, as long as you can distinguish it from the cube and from a piece of paper (flaps are made to be cut out).
Let's now implement an add_flaps function that takes a Graphic with a rectangular shape as the graphic parameter and adds flaps on its sides if their corresponding parameter among left, top, right, bottom is True.
Use the pytamaro functions graphic_width and graphic_height to find the width and height of the given rectangular graphic.
Example: calling add_flaps(True, False, False, True, MY_SQUARE) should add flaps on the left side and on the bottom side of the MY_SQUARE Graphic.

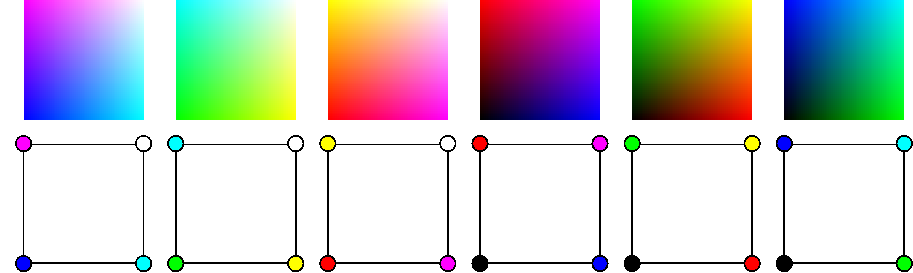
The RGB Cube's faces
Now we have a function that can add flaps to the specified sides of a given square. Let's then focus on the faces of the RGB cube.
These are the six faces needed for the construction of an rgb cube. Pay attention to the colors of the corners.
The pixel function
Implement the pixel function so that it returns a square of the given size colored with the given intensity of red, green and blue. Parameters red, green and blue should be integer values between 0 and 255. Use the pytamaro rgb_color function to generate a color with the desired intensity of each primary color.
The face function
Ideally each face should be composed of 256 x 256 pixels representing 65'536 different colors, all increasing in intensity of two of the primary colors going horizontally and vertically. The issue with this implementation is that it takes a long time (around 40 seconds) to generate all the faces (6 * 65'536 = 393'216 pixel graphics for a whole cube!).
A possible solution is to give up some resolution and, for example, compose a face with 128 x 128 pixels where each pixel is twice as big as the pixels in the previous version, and the color of the next pixel has an intensity of +2 with respect to the previous one.
An even faster and still fairly high quality solution is a face with 64 x 64 pixels, where each pixel is 4 times as big as what it would be in the 256 x 256 case, and the difference in intensity of a primary color between each pixel is of 4.
The better the resolution, the more pixels are contained in a face, therefore the slower is the generation of a face.
Implement the face function so that the resulting face satisfies the following properties:
- parameters
v_axisandh_axisindicate the primary color whose value increases along the specified axis. They accept the following strings as possible values:"red","green"and"blue" - starting from the bottom left corner, vertically, the value of the given
v_axiscolor increases from 0 to 255 - starting from the bottom left corner, horizontally, the value of the given
h_axiscolor increases from 0 to 255 - If boolean parameter
presentis True, the third primary color (not inv_axisand not inh_axis) is present on the face and its value is 255: these faces have the third primary color as the bottom left corner and white as the top right corner (white = (255, 255, 255)) - If boolean parameter
presentis False, the third primary color (not inv_axisand not inh_axis) is not present on the face and its value is 0: these faces have black as the bottom left corner (black = (0, 0, 0)) sizeis the wanted size for the square's sidesresolutionis an integer between 0 and 8. It indicates the number of pixels for each side of the face, calculated by 2 ** resolution, therefore 0 is minimal resolution (1 pixel per face), 8 is maximal resolution (side of the face is composed of 256 pixels). A resolution of 6 (64 pixels per side) should not be too slow to generate and still be of good quality.
Use the pixel function you implemented and the pytamaro functions empty_graphic, beside and above
The RGB cube
The following graphic can help you visualize the rgb cube as a surface development.
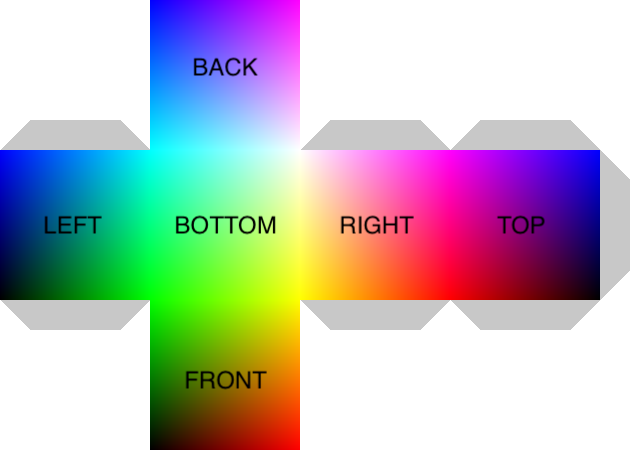
The text is just a guideline to help you visualize the cube once built. You don't need to generate the text in your solution.
The Faces function
As mentioned before, there are multiple ways of constructing a cube development and you are free to choose the configuration that you prefer.
Your job now is to combine all the different faces of the RGB cube by rotating them and placing them one beside or above the other. Before doing that, we want to easily access each of the faces by referring to them with a name, to do this we can use a dictionary.
Implement the faces function such that it returns a dictionary that maps strings like "left" to their corresponding face (correct colors and rotated according to its position in the cube development), given the face_size of each face and the resolution of each face.
Use the rotate function and the face function you implemented. Follow the template in the code cell.
Your job now is to combine all the different faces of the RGB cube by using above and beside, together with the add_flaps and faces functions that you implemented, such that the resulting cube development can be built into an RGB cube once folded.
Remember that the the code takes a long time executing with a high resolution!
Implement the rgb_cube function such that it returns the cube development of an RGB cube.
This activity has been created by LuCE Research Lab and is licensed under CC BY-SA 4.0.
RGB Cube

PyTamaro is a project created by the Lugano Computing Education Research Lab at the Software Institute of USI
Privacy Policy • Platform Version 825d63e9 (Fri, 10 Jul 2026 09:03:29 GMT)