Swiss Hiking Direction Pointers
Switzerland has an extensive hiking trail network with 65000 kilometers of signed hiking trails. There are three kinds of trails: hiking trails (marked in yellow), mountain hiking trails (marked in white-red-white), and alpine hiking trails (marked in white-blue-white).
The trails are signed with four kinds of signs, amongst them hiking direction pointer signs.
Let's compose those signs with PyTamaro!
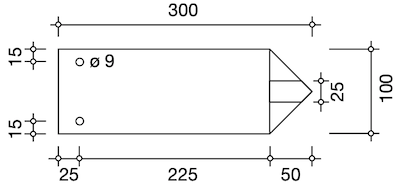
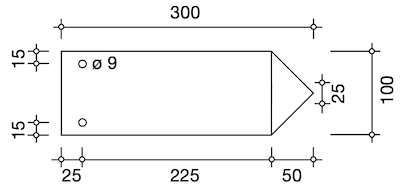
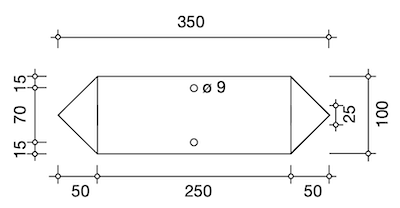
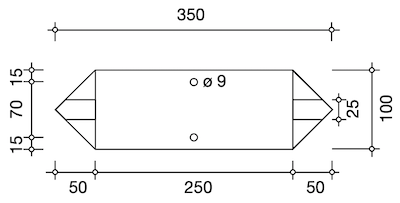
You probably saw a triangle next to a rectangle. That's great!
The measurements of the triangle are given by its width and height. But the PyTamaro triangle function expects two sides and the enclosed angle.
You may want to decompose the triangle into two right triangles (top and bottom half). Those you can construct given the width and half the height.
Helper Functions
Let's first implement some functions that you are going to need in order to build a direction pointer.
The right_point Function
Implement the right_point function so that it returns a right pointing triangle of the given
width, height and color.
Decompose the triangle into two right triangles (top and bottom half).
Those you can construct given the width and half the height.
You can use the right_triangle function from your toolbox
(if you don't have that function in your toolbox yet, you may want to do the
Triangles activity).
The striped_right_point Function
The striped_right_point function should return a right pointing triangle with the given
width, height, and color arrow_color.
The white part of the point should be of the official traffic_white color.
The striped right point below has black as the arrow_color
As you can see, the official documentation does not give information about the width of the rectangular part of the little red arrow, or the width of the little red point (only the height of the arrow!).

To build the little colored arrow you do need trigonometry, remember the similar triangles rule?
The similar triangles rule states that if two triangles have their corresponding angles equal in measure and their corresponding sides proportional in length, then the two triangles are said to be similar. This means that their shapes are the same, but they might be scaled up or down.
As you can see from this drawing, the big white triangle and the small red one are similar. This means that since we know the width and height of the bigger one, and only the height of the smaller one, we can easily find the width of the small one (the width is the black line)!
In fact the ratio between the width and height of the white triangle is the same as the ratio between the width and height of the red one, since they are similar!
Implement the striped_right_point function so that it returns a striped right pointing triangle of the given
width and height, with an arrow of the given arrow_height and arrow_color.
Compute the width of the arrow's point using the similar triangle's rule!
The right_sign Function
Implement the right_sign function so that it returns a unidirectional pointer oriented to the right,
with the wanted width, height, point_width, and color.
With this funciton you should be able to generate a general sign with any wanted measurements!

Use the right_point function you implemented.
The striped_right_sign Function
Implement the striped_right_sign function so that it returns
a striped unidirection pointer oriented to the right,
with the wanted width, height, point_width, arrow_height, body_color, and arrow_color.
The given body_color should be the color of the rectangular part of the sign.
With this funciton you should be able to generate a general sign with any wanted measurements!

Use the striped_right_point function you implemented.
The bi_sign Function
Implement the bi_sign function so that it returns a bidirectional pointer sign,
with the wanted width, height, point_width, and color.
With this funciton you should be able to generate a general sign with any wanted measurements!

Hint: use the right_sign and the right_point functions that you implemented.
The striped_bi_sign Function
Implement the striped_bi_sign function so that it returns
a striped bidirection sign, with the wanted
width, height, point_width, arrow_height, body_color, and arrow_color.
The given body_color should be the color of the rectangular part of the sign.
With this function you should be able to generate a general sign with any wanted measurements!

Hint: use the striped_right_sign and the striped_right_point function you implemented.
The Official Direction Pointers
There are three kinds of trails: hiking trails (marked in yellow), mountain hiking trails (marked in white-red-white), and alpine hiking trails (marked in white-blue-white).
Now that we have a bunch of helper functions, we can implement all the direction pointers!
Let's start by defining the official colors and measurements.
The Colors
The hiking direction pointer is a yellow sign. The colors are specified in the handbook of hiking trail signage, and are the following:
- RAL 9016 "traffic white": RGB: 241-241-234
- RAL 3020 "traffic red": RGB 187-31-17
- RAL 1007 "daffodil yellow": 232-140-0
- RAL 5015 "sky blue" RGB: 0-124-175
Let's assign these colors to variables in our code below. This way instead of generating the color every time it's needed, you can just use one of the variables that holds its value.
The measurements for the direction pointers are also specified in the handbook of hiking trail signage published by Swiss Federal Office of Streets and the Swiss Hiking Trail Association.
The Hiking Trail Direction Pointers
Let's start with hiking trail direction pointers.
We are now going to implement functions that generate direction pointers with their official measurements and colors.
The Hiking Trail Unidirectional Pointer
Implement the following function so that the resulting sign points to the right if the value of parameter right is True,
otherwise it should point to the left.
Use the official measurements and colors.

Use the right_sign funciton you implemented, with the official measurements and colors of the hiking trail direction pointer
The Hiking Trail Bidirectional Pointer
Implement the following function so that the resulting sign points both to the left and to the right. Use the official measurements and colors.

Use the bi_sign function you implemented, with the official measurements and colors of the hiking trail direction pointer
The Mountain Hiking Trail Direction Pointers
The Mountain Hiking Trail Unidirectional Pointer
Implement the following function so that the resulting mountain trail sign points to the right if right is True,
otherwise it should point to the left.
Use the official measurements and colors.

Use the striped_right_sign function you implemented, with the official measurements and colors of the mountain trail direction pointer
The Mountain Hiking Trail Bidirectional Pointer
Implement the following function so that the resulting sign points both to the left and to the right. Use the official measurements and colors.

Use the striped_bi_sign function you implemented, with the official measurements and colors of the mountain trail direction pointer
The Alpine Hiking Trail Direction Pointers
The alpine hiking trail direction pointer is similar to the mountain one, but completely blue and white.
The Alpine Hiking Trail Unidirectional Pointer
Implement the following function so that the resulting alpine trail sign points to the right if right is True,
otherwise it should point to the left.
Use the official measurements
Use the official measurements and colors.

Use the right_direction_sign function you implemented, with the official measurements and colors of the alpine trail direction pointer
The Alpine Hiking Trail Bidirectional Pointer
Implement the following function so that the resulting sign points both to the left and to the right. Use the official measurements and colors.

Use the striped_birection_sign function you implemented, with the official measurements and colors of the alpine trail direction pointer
What You Learned
You learned about one type of signage you encounter on the Swiss hiking trail network. This type of sign signals the trail in case of forks or strong changes of direction, if its course cannot be clearly signaled by confirmations and markings.
You also (hopefully) practiced to structure your code so you can reuse functionality. Implementing all those helper functions in the beginning may have seemed useless or confusing, but in the end it allowed you to decompose a bigger problem into simpler and reusable code.
If you are planning on doing the Swiss Hiking Signpost, you should save the
right_sign, striped_right_sign functions in your toolbox,
to be able to generate generally-sized signposts.
This activity has been created by LuCE Research Lab and is licensed under CC BY-SA 4.0.
Swiss Hiking Direction Pointers

PyTamaro is a project created by the Lugano Computing Education Research Lab at the Software Institute of USI
Privacy Policy • Platform Version 8ff437e (Mon, 09 Feb 2026 13:16:13 GMT)
